Tiny Targets For Short-range, Long-distance Archery Practice
by Scot Heath
Scot Heath created a macro using Microsoft's PowerPoint softwarea decade or so ago! It's been a favorite for archers and coaches ever since he allowed us to post a copy on the TSAA's documents page (Items of Interest).
With this macro, one can print a FITA 5-color 10-ring target (and others) that will the the appropriate relative size so as to appear in your aperture looking like it is a specific distance away, even though you are NOT that actual distance. So at say, 18 meters, the target will appear the same size in your aperture as if it was 70 meters away! Brilliant, to my thinking!
With his permission I have maintained a copy of the ppt file needed on the TSAA website, and it has always garnered positive comments from those that found and used it to enhance training opportunities.
Recently (July, 2016), Scot wrote me: "I just received a note from someone having trouble generating targets with the marcos I wrote so many years ago. Seems Microsoft has changed the tool bar a bit and although things still work correctly, the path to find the macros is a bit different. I’ve included an updated file with the correct path listed on the slide that is loaded when the file is open."
SO, here is the newer version of TinyTargets , and for those with the older version of PowerPoint or perhaps an open-source program with the ability to handle PPT files, here is the older version.
And the original page explaining all of this, and remember, MS has changed PowerPoint's screens, so you may NOT see exactly the same thing on your screen as I have depicted below in the tutorial.
Sub-Yardage Spot Target Generator (circa 2002)
by Scot Heath
aka: Tiny Targets
Do You.....
-LIke to shoot spot targets?
-Need to train at home, shooting at less than the standard distances?
-Want exactly the correct sight picture of your target of choice?
Good news! If you have Microsoft PowerPoint, you can generate NFAA 5 spot
targets, NFAA/FITA 3 spot targets, their single face equivalents or 60cm FITA
singe faces properly scaled for any distance less than or equal to the standard
distance. Also, 80cm FITA and 122 cm FITA targets have been added with a
slightly different scaling choice (since they are shot at multiple yardages.) In
addition to providing the proper sight picture, with the entry of your arrow
diameter, dashed scoring lines are drawn so you can establish exactly what your
score would be shooting standard targets at the correct yardage. Targets are
generated to be printed on standard 8-1/2" x 11" paper.
This prints a proportionately smaller target on notebook paper that will
resemble (in your aperture) the standard target at the proper distance. This
is for shooting at a target butt from less than the official distance.
D. Falks of the Archery Shooters Association first provided this file to me during an NAA level III course at the Olympic Training Center in Colorado Springs, August 2005. (Thanks, Dee!)
I have since discovered the originator's name, which is Scot Heath, of Fort Collins, CO. Scot has graciously granted permission to post this here, and he has also updated the PPT macro to handle more types of targets. You can email Scot using this link. Please note that all rights are reserved - you may NOT profit from this by attempting to sell it.
You need a copy of MS PowerPoint to use it, and you must enable macros in the program before you load the PP file.
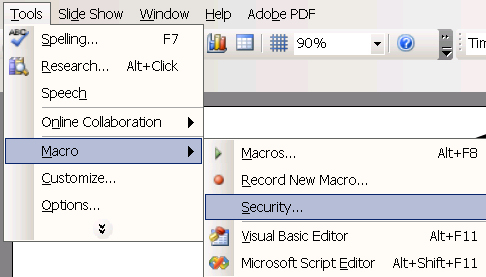
First, load Powerpoint and insure that macros are enabled (under
tools/macro/security):

and then load the scaled_targets.ppt file.
You may have to adjust your security levels in the program. Scot says:
"I've had a few folks who have had their PowerPoint security level set too high
and this prevents the macros from being enabled. I recommend setting the
security level to medium as that setting looks at the macro author and compares
it against your trusted list but unlike the high level which disables the macros
if the authors don't appear, PowerPoint then asks if you'd like to enable or
disable the macros.
To check/set the security level, start PowerPoint, click on
Tools->Macro->Security and choose Medium, OK. Close PowerPoint and then restart
it. Read in the scaled_targets file and when PowerPoint asks, Enable the
macros."
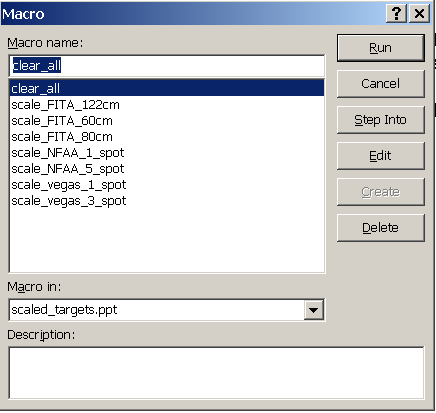
Run the macro by choosing Alt-F8 or else "Tools/Macro/Macro/Run" and pick one of the following:
-
scale_NFAA_1_spot
-
scale_NFAA_5_spot
-
scale_vegas_3_spot
-
scale_vegas_1_spot
-
scale_FITA_60cm
-
scale_FITA_80cm
-
scale_FITA_122cm
This is the window you will see after
loading:
NOTE: Do not choose "clear_all"!!

Choose Run.
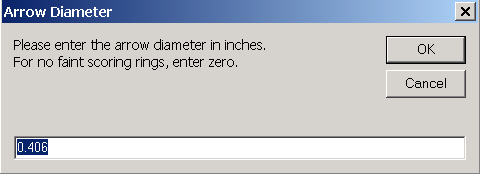
You will see:

Change the default to your arrow's diameter in fraction of an inch and
then click OK.
Hint: for Easton shafts, such as 1619, the
"16" is actually "16/64", which divides to the fraction
"0.25" . So you would enter 0.25 as the arrow diameter in inches.
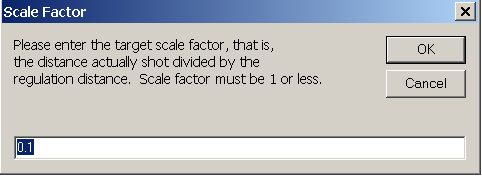
You will then see:

To print a target used at 18 meters, just enter
the number of yards
(ie, > 1 and <= 18) , but if for a 60, 80, or 122 cm target then
you should enter a
factor less than 1
So change the default of "0.1" to your desired distance scale factor.
For 60/80/122 targets:
To convert from yards to meters,
multiply yards (distance you are actually shooting) by 0.9144
yards/meter.
To convert from feet to meters, multiply feet by 0.3048 feet/meter.
Example: Shooting at 5 yards, when your target
choice (122cm) is normally used at 70 meters:
5 yards * 0.9144 meters/yard = 4.57 meters, so 4.57 / 70 = 0.066, enter
this as the scale factor.
Your targets will print on a 8 1/2 by 11 inch sheet of regular paper, such as this Vegas 3-spot:

From Scot:
The need for dotted "scoring" lines arises from the fact that the diameters
of the arrows used by an archer don’t "scale" as the target scales. This results
in artificially high scores when scaled targets are used if a correction is not
applied. For an arrow that is not a direct center hit, the arrow strike point
can be assigned an angular deviation from the archer. To properly represent that
same score at less than the actual distance, the location of the portion of the
shaft closest to the center of the target must be properly represented.
Here's an example:
Two arrows of diameter .20” and .40” impact a 40cm target at normal 18m distance
and are just outside the 9 ring so they both score 8. The angular deviation that
is responsible for the non-center hits is different for the two arrows. The
smaller diameter arrow actually has less angular deviation; that is, it was a
better shot. Now, imagine moving those arrows back along vectors from the
shooter to the center of the holes they made at 18m while at the same time
scaling and moving the target back towards the shooter along a vector aligned
with the center of the target. As soon as motion begins, the larger arrow
immediately moves closer to the center of the target than the smaller arrow and
becomes a 9. A short distance further, the small arrow's score also becomes a 9.
The centers of the holes distance from the center are still correctly scaled and
represented outside the 9 ring but both arrows are now 9 whereas, the actual
shots were 8. This means that at any point closer than the original 18m
distance, the large arrow makes a hole whose innermost part is closer to the
center of the target than the smaller arrow and eventually, both arrows result
in scores higher than they should. Taken far enough both arrows would touch the
X ring since the rings get very small and the arrows don't. This of course does
not accurately represent the relative positions of the arrows at 18m where the
innermost portion of both arrows was exactly the same distance from the center
of the target. In order to accurately represent the relative position of the
innermost portion of both shafts at any distance, different diameter scoring
rings must be drawn which correctly account for the difference in arrow
diameter. The macros correctly generate these rings. I chose to make the scoring
rings faint and print them in addition to the visual rings so that the scope
picture would remain correctly scaled while simultaneously, proper scoring could
be done.
There is a limit to the useful range of scaled targets, that is, when the
diameter of the X scoring ring reaches zero (the arrow must touch the exact
center of the target to score an X. This distance is different for different
diameter arrows but is so close it can be ignored.