|
In the beginning you need a big target to shoot at.
You might live in an area where you can shoot in your back yard or otherwise
outdoors. You might have a boatload of deer that will eat your target
backstop if you make it out of straw or hay bales.
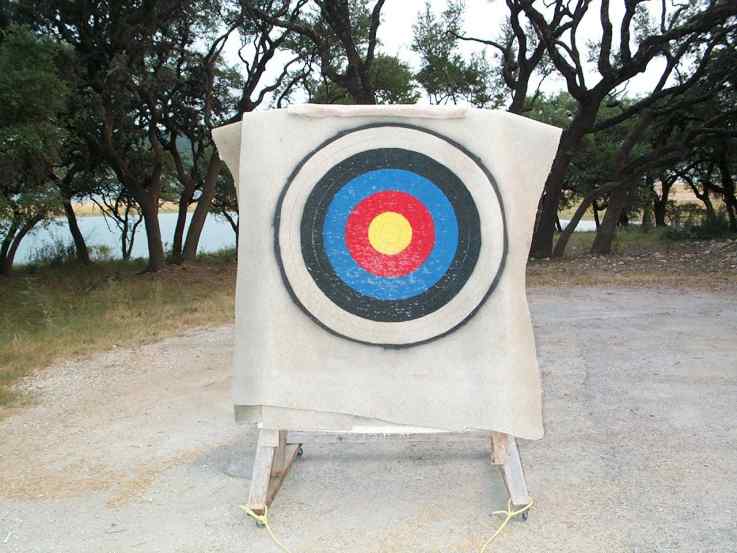
The official FITA-style paper target
of white/black/blue/red/yellow rings isn't too durable, but it sure makes aiming
more fun.
You don't know if you or your kid is going to stay with the
sport, so you need something safe to shoot at that doesn't cost an arm or a leg. I had these problems, so I
tried stringing a rope and hanging sections of 1" thick styrofoam board,
like that used in building insulation, but it wasn't too durable and it looked a
little tacky swinging from the trees. Also, it moved in a breeze, which
wasn't too good for aiming, especially for beginners.
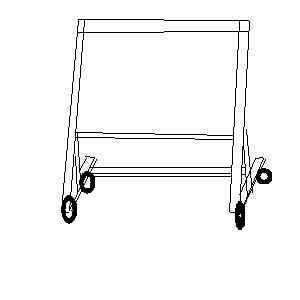
I had some leftover sawhorses made out of 2 by 4 lumber and some
scraps of various pieces of lumber. By putting a few scrap sections
of 1x4 boards on two of the legs (broadside), and a cross member at the top, I made a
simple framework
to hold sections of carpet as a buttress(backstop). The square formed by the three
sections of 1x4 wood measured roughly 4 feet across and 5 feet high. I bought 4
large black steel and rubber wheels to make the contraption movable.
By screwing the upright 1x4s to the two front legs of the
sawhorse, I had a natural angle tilting back, much like the official FITA target
stand specifications. This gives you an oversize shooting area
inside of the framework of 1 x 4s, even at longer distances it makes it easier
to hit the butt for novice archers.
As mentioned before, I have a problem with lots of deer in the
neighborhood that will eat hay bales down to nothing overnight, and also I
didn't like the appearance of raw styrofoam-type boards, after just a little use. I
stopped off at a neighborhood carpet store and asked about scraps and
leftovers. The salespeople weren't too helpful, but I looked around back
and noticed a large dumpster brimming with scraps and remants and used
carpeting. Much to the mortification of my daughter I jumped into
the dumpster and started heaving large sections out. I folded them
up, tucked them into the van, and away home we went.
Normal, regular old carpeting, large enough to screw to the 1 x
4 frame with lots of overlap, made a perfect target buttress. I
found that for under 40 pounds of bow, 4 layers of carpeting with the underside
facing the archer made a great arrow stop. I experimented with two layers
of carpet with a styrofoam board sandwiched in between, and that worked pretty
well also. I did double over a layer of carpet on top of the 1x4 frame so
that arrows wouldn't drive into/through the wood. Most of the
construction was done with a cordless dewalt drill driving 1 to 1 1/2 inch long
outdoor (rust resistant) screws. I did virtually no fine measurement - just eyeballing and guesstimation.
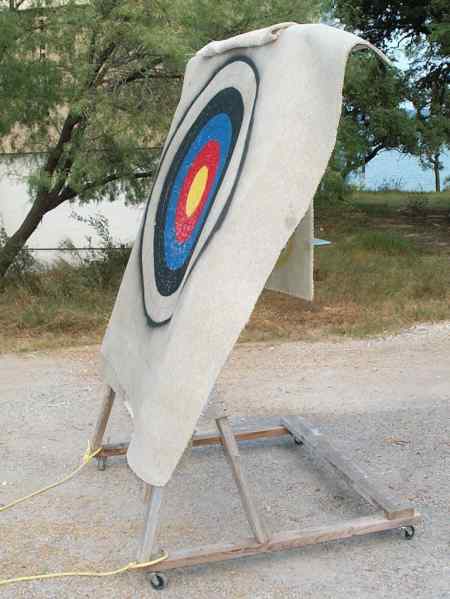
For the topmost layer of carpet, I anchored it only at the very
top of the frame. This lets me flip the carpet over the top, so that it
hangs down the back of the stand and reveals the next layer down.
The top layer holds one size (60cm) target and the next layer down, 122cm
target. The bottom side of the carpet is rough but quite paintable. It was
time to spend some money.
I made a trip down to the temple - Home DeePot, and bought 4
cans of inexpensive spray paint - black, red, blue, and yellow, at around $2
each. The carpet was already kind of white/tan, so I left that for
the white ring of the FITA target. I also bought 4 steel and
black rubber wheels to make the contraption portable, for around 15 dollars
total. The last stop was at the archery shop, where I bought a 60 cm and a
122 cm FITA target. Less than 12 dollars there.
Once home I got out a razor blade and cut the
paper 60 cm target into
each color ring. I found the center of the topmost carpet layer, laying it
flat on the ground. Using screws to mount the carpet onto the frame makes
it easy to take them on and off as needed. By laying all of the
cutout rings on the carpet and removing only one at a time, I was able to spray
the appropriate color onto the carpet, using the other rings as a paint mask. Waited 5 minutes, and then
sprayed another coat before going on to the next color. In short
time I had a regulation size 60 cm target painted onto the carpet.
The paint and target will last all summer long, through sun and rain, and deer
won't give it a second thought. It stops carbon as well as aluminum arrows
quite nicely.
For the 122 cm target, I needed a compass to draw
circles. I took a 3/4" by 3/4" by around 4' long straight
stick, and put a nail in the end of the stick through the short side of the
stick. I pressed this nail tip into the dead center of the x ring of the
gold and marked on the stick each color moving out from the center. I
marked each circle for 10,9,8,7,6,5,4,3,2,1, and 0 on the stick. I
then drilled a hole in the stick at the marks, large enough so that I could
stick a marker through the hole to mark on the carpet the circles for each
number.
The next step was to make a stencil. I had some 1/4"
plywood left over from another project, and I used the measured stick to draw
the concentric circles at the appropriate color lines. Do not draw the
circles for the "same-color,score+1" rings, such as the ring between 1
& 2, 3 & 4 , etc.
Use a handheld jig saw to cut out the plywood rings, using a
fine tooth blade. As with the paper stencil for the 60 cm target, lay all
of the rings on a section of carpet with the bottom side up. Remove just
one ring, and spray the appropriate color onto the carpet. Lay it on thick
- the carpet absorbs it well. Once the paint has dried a little, replace
that ring and remove the next, spray with the next color.
After all the colors are sprayed, use the measuring stick with a carpenters
pencil to draw the black
lines between each score number on the carpet target. Once it
is dry mount it on the 1 x 4 frame, and take out the bow.
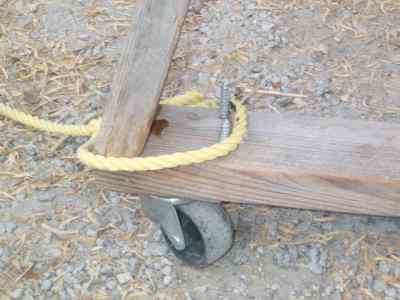
Oops, forgot the wheels. I mounted the sawhorse on a
couple of 2x6 boards (scrap again), and screwed the wheels into the boards so
that the whole shooting match can be easily wheeled out in the street or
driveway for practice. Depending on distance, one of the targets
gets flipped over the back, out of the way. A little length of rope
makes it easier to tow around.
Targets made out of carpet can last for many months, even when
rained on or left out in the sun. Unlike cardboard, being wet from
rain has no effect. Deer won't eat it. When the target gets a little
ratty or shot out, you can easily renew it by getting out the stencil and the
spray paint. One drawback is that it's hard to attach a regular
paper target unless you have an arrow stapler or use duct tape, or both.
If you are going to use paper targets, I'd suggest inserting a single layer of
styrofoam beadboard under the top layer of carpet to nail the staples to.
Save the plywood and paper stencils for re-use.
|
 I
found that it was easy to retouch the gold area and use a sharpie to redraw
the ring, using the templates...
I
found that it was easy to retouch the gold area and use a sharpie to redraw
the ring, using the templates...